Next weekend, I'll be volunteering for Food Network's South Beach Wine and Food Festival. I know, I'm pretty excited. This will be my first real event. I've volunteered at my school, but this time I'll be working with a chef from Miami to prepare and plate his menu. Not only will volunteer work look good on my resume, I'm looking forward to working with professional chefs in this capacity. School can only teach you so much. I need to get out there and get some real experience under my belt.
I've included the link for the event if you would like to check it out. I'll report back with how it went. Wish me luck :)
NY Times Travel Show and Food Network's South Beach Wine and Food Festival
Sunday, February 20, 2011
Monday, February 14, 2011
Sandwich Day :)
This was a nice change from some of the really rich, heavy dishes we've been making lately. We covered your basics: Cold, Hot, Open-Faced, Grilled, and Tea sandwiches. It made for a tasty, laid-back morning. And it also gave me lots to consider for potential catering recipes...

Yesterday also marked the end of Module 2. It seems like we have been flying through these lessons. Next up will be French, Italian, and Asian cuisine.

Yesterday also marked the end of Module 2. It seems like we have been flying through these lessons. Next up will be French, Italian, and Asian cuisine.
Monday, February 7, 2011
As Requested
I really appreciate all of the positive comments I've been getting. It's nice to know that these posts aren't just falling into cyberspace nothingness. We have come to the end of our second module. This section concentrated on dry and moist-heat cooking methods. While my family has thoroughly enjoyed the fruits of my labor, I have enjoyed learning the "proper" ways of cooking. I mean, everyone knows your basic terms: grilling, sauteing, poaching, braising, stewing, etc... but could you actually explain the execution of each? I can, now :)
I had posted some pictures on Facebook, and a request had been made for the recipe for Broccoli Souffle. So, here it is. Made correctly, this is a beautiful, light and airy, but fully flavored dish. Enjoy...

Broccoli Souffle (Yields 6 Souffles)
Butter (as needed)
Flour (as needed)
20 oz. Broccoli (peeled and trimmed)
Milk (as needed)
2 oz. Butter
Salt, Pepper, and Nutmeg (to taste)
2 oz. Grated Gruyere cheese
4 Egg Yolks
8 Egg Whites
Coat inside of ramekins completely with butter and dust with flour
Blanch broccoli in salted, boiling water until cooked. Shock in ice bath.
Puree broccoli in blender until smooth. Add milk, as needed, to help mixture blend.
Place puree in saucepan and cook over medium-high heat until milk is cooked out. Mixture should be very thick. Season, to taste, with salt, pepper, and nutmeg. Stir in grated gruyere cheese until melted, and add egg yolks. Remove from heat.
Beat egg whites until stiff peaks form. (Should be able to hold whisk upside down and egg whites still stand up) Fold egg whites into vegetable mixture in three batches. First addition will just be to combine. Second, fold a little more gently. And third addition fold just to incorporate. You want mixture to remain as light as possible.
Pour mixture into individual ramekins. Run finger, gently, around the edge of each ramekin to form a lip, almost. Bake in water bath for 10 minutes at 400 degrees Fahrenheit.
*You will not want to open oven at all during cooking time. This will release steam, and the souffle will not rise
This recipe can be made with different vegetables in the same preparation. Substitute 10 oz of trimmed cauliflower or 12 oz of unpeeled zucchini for the broccoli.
Wednesday, January 19, 2011
Ode to Grilled Cheese
Can one ever have enough grilled cheese sandwiches? I think not. I hit the ultimate jackpot this past weekend when my grocery store had marked down loaves of bread to $.19 and balls of fresh mozzarella for $.99. I stocked up on english muffins and wheat bread, but I really wish I would have cleaned them out of the Onion Rye loaves. This has to be the most delicious grilled cheese that I have EVER had...
Friday, January 14, 2011
My Super-Duper-Uper-Schmuper Big Idea...
Obviously I've been watching way too much PBS, but I was thinking about what I would like to do in the culinary world after I graduate. A big part of the direction I go will depend on the kind of externship I get. I would absolutely LOVE to be able to have an externship with a media group. I would like to experience all the different aspects of food media. I know that I don't want to work in a restaurant. I've toyed with the idea of eventually starting my own catering business. And of course there is always the very far-off dream of a cookbook or something. Anyway, my big idea just happens to be a possible concept for a cookbook. I'm sure that my professors will kill me for this, but I actually enjoy trying to create interesting and surprisingly good dishes from what I have in the pantry. I'm talking making due with canned goods. You always hear about people using the freshest ingredients to make exquisite dishes. Well, single moms can't really afford those kinds of luxuries.
Anyway, back to the point. It would be called, "Pantry Raid," and it would be comprised of recipes using ingredients that most people already have in their pantry. I'm sure that there is something like this out there already, but I sure haven't seen it. I'm rather tired of watching cooking shows, drooling over what is being made, to only realize that I would have to spend $30+ to buy the ingredients. So, let me know if you think I have something here. Below is the recipe for what I made of dinner last night, using your everyday pantry items. I thought it was pretty tasty...
Chicken Enchilada Lasagna
1 1/2-2 lbs Boneless, Skinless Chicken (I deboned and skinned the chicken myself)
1 28 oz can Green Enchilada Sauce
6 Medium-Sized Flour Tortilla Shells
1 15 oz can Black Beans
8 oz Shredded Cheese (Cheddar or Monterey, whatever you have on hand)
1 10 oz can Rotel Tomatoes with Chiles
I marinated the chicken in the enchilada sauce for a few hours in the fridge. Then, I placed the chicken and sauce into a baking dish and baked at 350 degrees for 45 minutes. This will take longer depending on the size of the chicken pieces. Just bake until chicken is cooked through. Then, I shredded the chicken using two forks to pull the meat apart, placing it back in the sauce once finished. In a greased, 9X13 pan, I placed two tortilla shells, then half of the chicken mixture, half of the black beans, tomatoes, and cheese. Follow with another layer of tortilla shells and repeat. Finish with a final layer of tortilla shells and sprinkle with a little more shredded cheese. Raise the oven to 400 degrees and bake for 15 minutes or so to melt the cheese.
*While this was really good, another idea would be to use tortilla chips instead of the shells. I crushed some chips on my plate anyway, and the crunch was really nice. I also had sour cream and guacamole for toppings. Enjoy and I would love your comments :)
Wednesday, January 5, 2011
It's Been Too Long...
Sorry it has taken me so long to update. Now that school has actually started, I've been quite busy...
I haven't been the biggest fan of getting up at 5 to catch a 6:00 bus, but it's the price you pay for public transportation. Luckily, I only have to do it two days a week. So far, it has been amazing, and well worth it. We started by learning basic knife cuts and how to break down different cuts of meat. I have personally filleted three fish, shucked a dozen oysters, "displaced" a live lobster, and broken down multiple chickens, a rabbit, duck, and basically a quarter of a cow. That was just in the first two weeks. Needless to say, we move pretty quickly.
Next, we moved on to the "Mother Sauces." The basis for almost every other sauce that you can think of. We used these sauces as the base for a handful of soups that we made, including Carrot Puree soup and Cream of Broccoli soup. I'll make sure to update with those recipes later...
We have moved on to dry heat cooking methods, now. My dad was pretty excited when I brought home sauteed chicken breast, flank steak, strip steak, and scallops the other day. Yes, I get to bring home everything we cook :)
I'm also taking my first extra-curricular class is a couple of weeks. It is about the origin of chocolate, and the guest speaker was a contestant on Top Chef: Just Desserts. Pretty cool, I know...
Wednesday, October 6, 2010
On My Way
My daughter took it upon herself to lay down on the couch for a nap, so I have some time to update everyone...
I have officially chosen a school-- The Institute for Culinary Education in NYC. I will actually start classes in November, and I am SUPER excited. I don't want to wait another month, but the October classes were full. Oh well... I'm really looking forward to everything that I'm going to learn, and this school offers amazing opportunities and connections. They require an externship once you're done with classes, and they place you with some of the most renowned restaurants in New York, and even Food Network and Everyday with Rachael Ray!!! I can see it now, Rach and I pal-ing it up in the kitchen :)
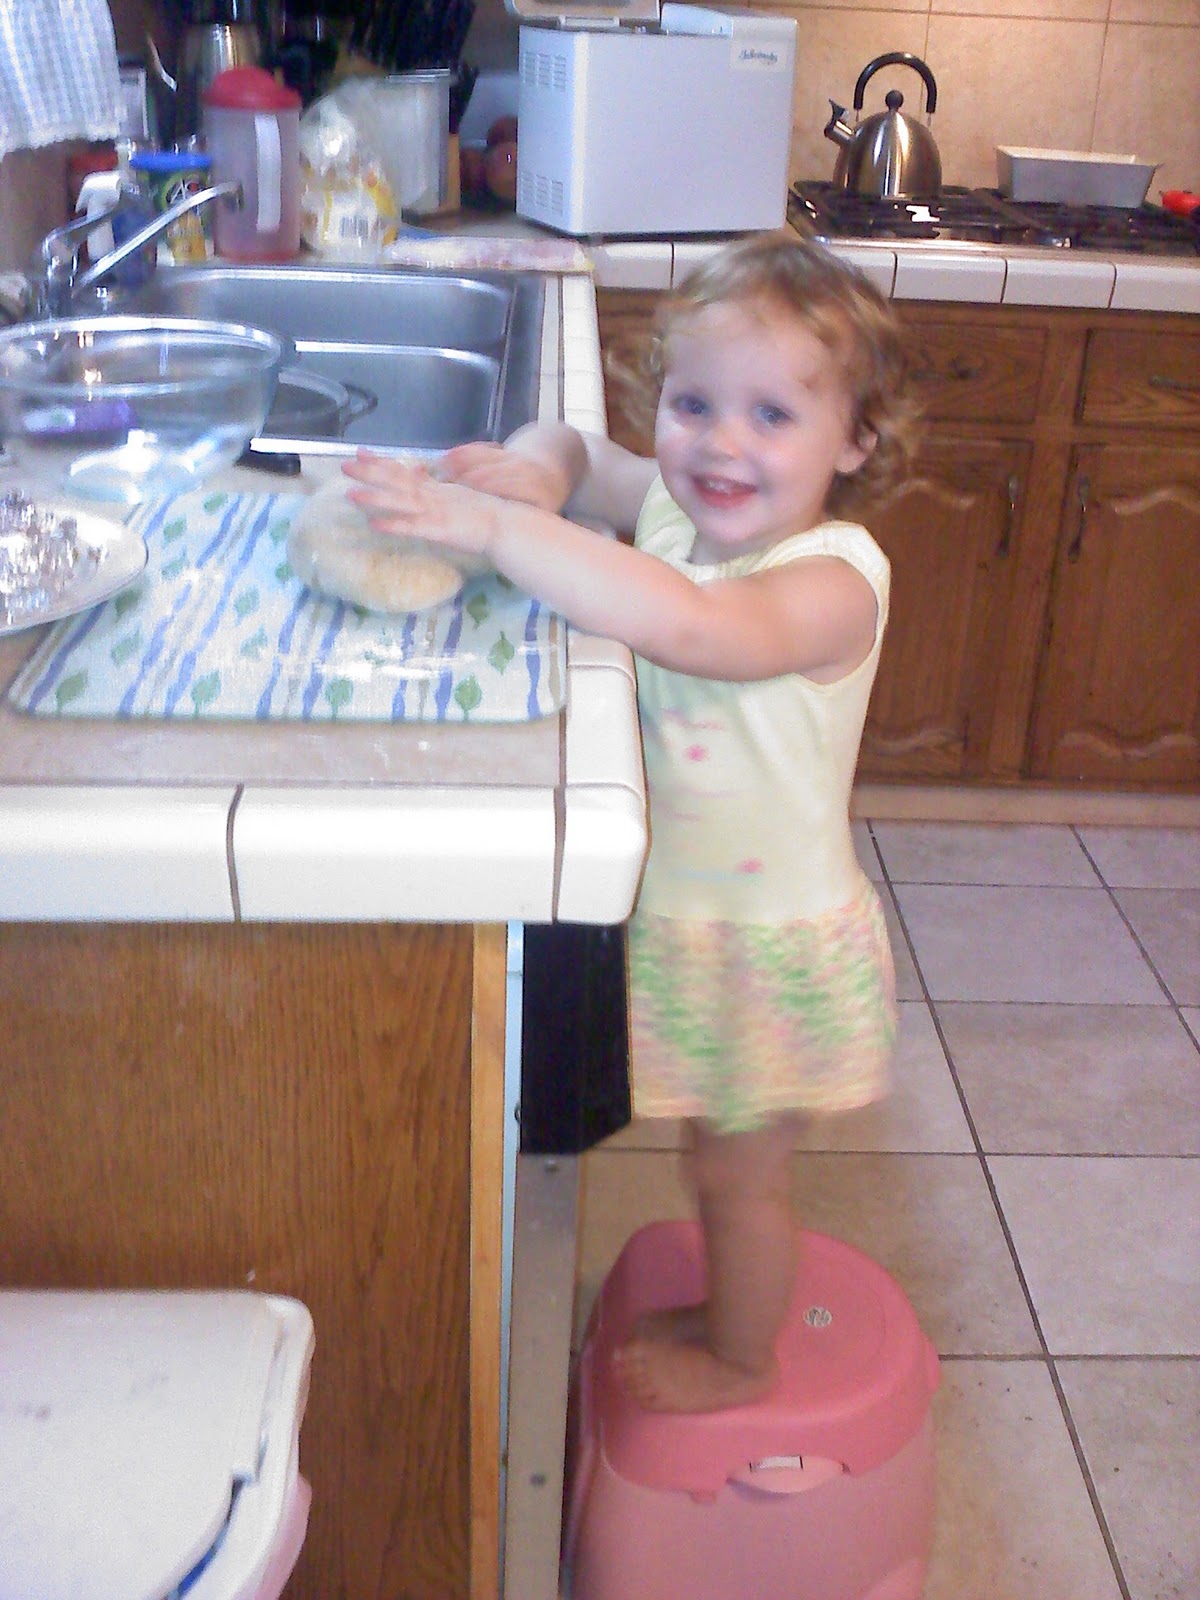
Anyway, enough daydreaming. Brooklyn and I have been busy in the kitchen, ourselves. In the last two weeks, we have made two loaves of whole-wheat bread, pizza dough, and a carrot cake. I won't include all of the recipes in this one post, but I will put them up here eventually. I guess you'll just have to keep checking in... ;) I managed to get a picture of Brooklyn kneading the dough. Too cute! I hope you enjoy this as much as we did. I felt a lot better about eating bread knowing exactly what was in it. Except for the time put in, it seemed a lot more economical, too.

Whole Wheat Bread (One Loaf)
1 Cup Warm Water
1 T. Milk
2 T. Oil
2 T. Honey
2 T. Brown Sugar
1 t. Salt
1 1/2 Cup All-Purpose Flour
1 1/2 Cup Whole Wheat Flour
2 t. Instant Active Dry Yeast
Combine all ingredients in a bowl and stir until incorporated. Turn out onto a floured surface and knead until well-mixed (about 10 minutes).
Place in bowl and cover. Allow to rise until doubled.
Punch down and knead for a few minutes.
Place in greased bread pan, cover, and allow to double again.
Bake at 350 degrees for 30-35 min.
Cool in pan on wire rack for 10-15 min. Allow to cool completely before slicing.
* I actually made the dough in my bread maker, on the dough setting. Just put all ingredients in bread maker as listed. The bread maker allows the bread to rise once, so just take it out when it's done, knead a little, and allow to rise again in bread pan. Also, if you would like to make this recipe a little more "whole wheat," you can use 1 Cup of AP Flour, and 2 Cup of WW Flour. I did this the second time I made bread. It still tasted good, but I liked how half and half turned out better.
I have officially chosen a school-- The Institute for Culinary Education in NYC. I will actually start classes in November, and I am SUPER excited. I don't want to wait another month, but the October classes were full. Oh well... I'm really looking forward to everything that I'm going to learn, and this school offers amazing opportunities and connections. They require an externship once you're done with classes, and they place you with some of the most renowned restaurants in New York, and even Food Network and Everyday with Rachael Ray!!! I can see it now, Rach and I pal-ing it up in the kitchen :)
Anyway, enough daydreaming. Brooklyn and I have been busy in the kitchen, ourselves. In the last two weeks, we have made two loaves of whole-wheat bread, pizza dough, and a carrot cake. I won't include all of the recipes in this one post, but I will put them up here eventually. I guess you'll just have to keep checking in... ;) I managed to get a picture of Brooklyn kneading the dough. Too cute! I hope you enjoy this as much as we did. I felt a lot better about eating bread knowing exactly what was in it. Except for the time put in, it seemed a lot more economical, too.
1 Cup Warm Water
1 T. Milk
2 T. Oil
2 T. Honey
2 T. Brown Sugar
1 t. Salt
1 1/2 Cup All-Purpose Flour
1 1/2 Cup Whole Wheat Flour
2 t. Instant Active Dry Yeast
Combine all ingredients in a bowl and stir until incorporated. Turn out onto a floured surface and knead until well-mixed (about 10 minutes).
Place in bowl and cover. Allow to rise until doubled.
Punch down and knead for a few minutes.
Place in greased bread pan, cover, and allow to double again.
Bake at 350 degrees for 30-35 min.
Cool in pan on wire rack for 10-15 min. Allow to cool completely before slicing.
* I actually made the dough in my bread maker, on the dough setting. Just put all ingredients in bread maker as listed. The bread maker allows the bread to rise once, so just take it out when it's done, knead a little, and allow to rise again in bread pan. Also, if you would like to make this recipe a little more "whole wheat," you can use 1 Cup of AP Flour, and 2 Cup of WW Flour. I did this the second time I made bread. It still tasted good, but I liked how half and half turned out better.
Subscribe to:
Posts (Atom)